Nginx搭建流媒体服务器
如今直播非常流行,所以最近研究了下直播相关的知识。自己也在阿里云免费开通了直播相关的业务,但是使用阿里云的流媒体服务器会根据用量进行收费。所以自己想了下,能不能自己来搭建一个流媒体服务器,百度了下,哇哦!不错哟!居然Nginx就可以搭建流媒体服务器。Nginx作为常用的Web服务器,大家都很熟悉,所以本文就是主要介绍Nginx如何搭建流媒体服务器。
Nginx搭建流媒体服务器主要是需要nginx-rtmp-module模块。Github地址:https://github.com/arut/nginx-rtmp-module
安装步骤:
1、首先使用git克隆nginx-rtmp-module
[root@localhost ~]# git clone https://github.com/arut/nginx-rtmp-module.git
2、下载Nginx源码包
[root@localhost ~]# wget http://nginx.org/download/nginx-1.15.3.tar.gz
3、解压安装包,并进入解压后的目录
[root@localhost ~]# tar -zxf nginx-1.15.3.tar.gz
[root@localhost ~]# cd nginx-1.15.3
4、安装相关依赖
[root@localhost nginx-1.15.3]# yum -y install gcc gcc-c++ autoconf automake make openssl openssl-devel pcre pcre-devel
5、编译和安装
[root@localhost nginx-1.15.3]# ./configure --prefix=/apps/nginx-1.15.3  --add-module=../nginx-rtmp-module  --with-http_ssl_module
#以上需要添加nginx-rtmp-module模块
[root@localhost nginx-1.15.3]# make && make install
6、编辑Nginx的配置文件nginx.conf
[root@localhost ~]# vim /apps/nginx-1.15.3/conf/nginx.conf

#文件最后新增如下配置信息,必须在http块同层去添加,一定不要添加到http块内了,该配置主要用于推流使用
rtmp {
    server {
        listen 1935;  #监听的端口
        chunk_size 4000;
        application hls {  #rtmp推流请求路径
            live on;
            hls on;
            hls_path /hls;#我这里放在了根目录下,自行修改,该目录必须具有可读可写权限
            hls_fragment 5s;
        }
    }
}

#在http块中添加server,这个必须在http快中添加,切记
server {
    listen       8111;
    server_name  localhost;
    location / {
        root   /; #该位置为上面hls_path的上级目录地址
        index  index.html index.htm;
    }
    error_page   500 502 503 504  /50x.html;
    location = /50x.html {
        root   html;
    }
}
保存修改后,可以使用如下命令检查nginx配置文件
[root@localhost ~]# /apps/nginx-1.15.3/sbin/nginx -t
nginx: the configuration file /apps/nginx-1.15.3/conf/nginx.conf syntax is ok
nginx: configuration file /apps/nginx-1.15.3/conf/nginx.conf test is successful
启动Nginx
[root@localhost ~]# /apps/nginx-1.15.3/sbin/nginx #启动nginx

[root@localhost ~]# ps -ef|grep nginx #查看nginx进程信息
root      13818      1  0 18:58 ?        00:00:00 nginx: master process /apps/nginx-1.15.3/sbin/nginx
nobody    13819  13818  0 18:58 ?        00:00:00 nginx: worker process
nobody    13820  13818  0 18:58 ?        00:00:00 nginx: cache manager process
root      13822  13767  0 18:58 pts/2    00:00:00 grep --color=auto nginx

[root@localhost ~]# netstat -ntlp|grep nginx #查看端口信息,下面的1935和8111端口都有了,说明配置OK
tcp        0      0 0.0.0.0:1935            0.0.0.0:*               LISTEN      13818/nginx: master
tcp        0      0 0.0.0.0:8111            0.0.0.0:*               LISTEN      13818/nginx: master
tcp        0      0 0.0.0.0:80              0.0.0.0:*               LISTEN      13818/nginx: master
以上我们nginx搭建流媒体服务器就算完成,下面我们需要来测试下该流媒体服务器能否正常使用呢?这里我们需要设计两个知识点:
1、推流端(自己编写、其他工具如OBS)
2、拉流端(自己编写、video标签、其他工具)
这里我测试主要使用OBS作为推流端、使用video标签作为拉流端播放
一、OBS推流
官网地址:https://obsproject.com/
对应自己平台下载对应的版本,我这里使用的是windows,所以下载地址为:
https://cdn-fastly.obsproject.com/downloads/OBS-Studio-22.0.2-Full-Installer-x64.exe
安装方式:傻瓜式安装
配置方式:
设置->流->流类型选择(自定义流媒体服务器)->URL(配置的流媒体服务器地址)->流名称(随意指定,拉流的时候需要使用)
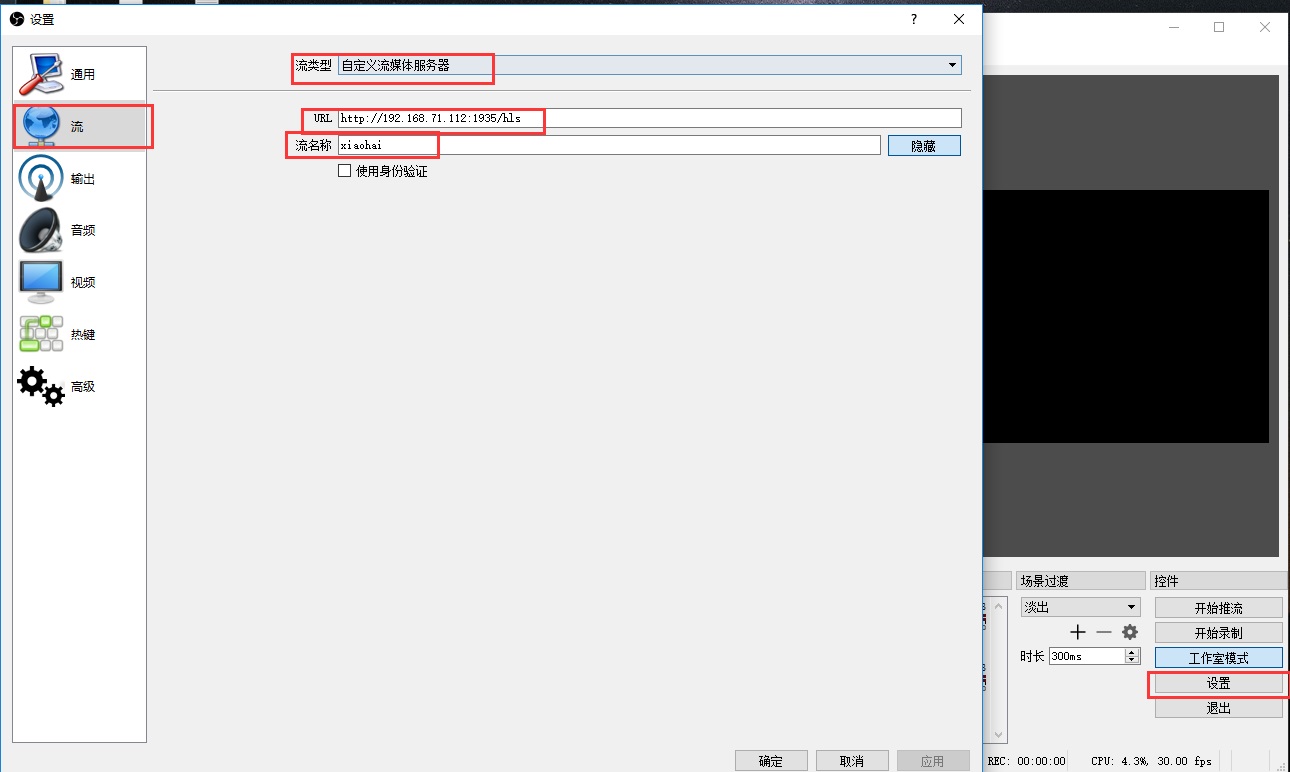
配置好后就确定保存,然后可以点击开始推流。
二、使用H5标签video进行拉流
#在80端口所在的目录下新建一个test.html
[root@localhost html]# vim /apps/nginx-1.15.3/html/test.html #保存如下内容

<video>
    <source src="http://192.168.71.112:8111/hls/xiaohai.m3u8"/>
    <p class="warning">Your browser does not support HTML5 video.</p>
</video>

#上面的地址中http://192.168.71.112:8111/hls/xiaohai.m3u8根据我们自己在OBS上的流名称来决定
以上都可以后,就可以使用手机浏览器打开这个网页,我这里是:http://192.168.71.112/test.html,如果可观看视频,说明整套流程全部完成,如果读者感兴趣,可以去/hls目录下看下里面文件的变化,这里就不进行说明了。
热门标签
每日一句
-
世界上最遥远的距离不是树与树的距离,而是同根生长的树枝,却无法在风中相依,世界上最遥远的距离,不是树枝无法在风中相依,而是相互嘹望的星星,却永远没有交汇的轨迹。
——泰戈尔
今日排行
- nc:多功能网络工具(扫描端口)
 nc是一个简单、可靠、强大的网络工具,可以建立TCP连接,发送UDP数据包,监听任意的TCP和UDP端口,进行端口扫描,处理IPv4和IPv6数据包。如果过系统中没有nc命令,需要进行安装:yum -y install nc
 - Iris框架打包成二进制文件(包含静态文件)
 最近在使用Golang的WEB框架Iris做了一个小的系统,但是里面有一些静态的资源,如css、js、html文件,如果只是通过go build打包的这些静态文件是打包不进去的,所以本文主要记录下如何将所以文件都打包的二进制文件中。
 - Python调用WPS把文档转换PDF,并把PDF转图片
 Python调用WPS把文档转换PDF,并把PDF转图片,首先需要安装WPS,然后利用pypiwin32把文档转化成PDF,再利用fitz、PyMuPD把PDF转化成图片
 - 冒泡排序(Bubble Sort)
 冒泡排序(Bubble Sort),是一种计算机科学领域的较简单的排序算法。
 - 图片视频下载利器:you-get
you-get是一个基于Python的开源命令行工具,主要用于下载来自多个视频网站的视频、音频和图片资源。它支持YouTube、Bilibili、Vimeo等平台,可通过简单命令快速获取下载链接并支持自定义保存路径和格式。
点击排行
- VSCode插件 - 快速生成表格并格式化
 快速生成表格
 - Electron页面跳转、浏览器打开链接和打开新窗口
 Electron页面跳转、浏览器打开链接和打开新窗口
 - Electron打包错误“Error: Application entry file ..”解决方案
打包出现如下错误:Error: Application entry file "dist\electron\main.js" in the "D:\gui\demo2\build\win-unpacked\resources\app.asar" does not exist. Seems like a wrong configuration.
- Git保存和清除用户名、密码
 在使用Git的过程中,不想每次都输入用户名和密码去拉取代码,所以就需要保存这些信息,那么既然有保存了,就必须有清除功能。
 - mac git用户名和密码修改
 在Mac电脑中,如何对Git的用户名和密码进行修改呢?起初不懂Mac,所以整了很久,本文将记录如何对这个进行操作,以便后期使用。
 - Docker编译出现:temporary error (try again later)
 Docker编译镜像出现:fetch http://dl-cdn.alpinelinux.org/alpine/v3.12/main/x86_64/APKINDEX.tar.gz
ERROR: http://dl-cdn.alpinelinux.org/alpine/v3.12/main: temporary error (try again later)
WARNING: Ignoring APKINDEX.2c4ac24e.tar.gz: No such file or directory问题
Docker编译镜像出现:fetch http://dl-cdn.alpinelinux.org/alpine/v3.12/main/x86_64/APKINDEX.tar.gz
ERROR: http://dl-cdn.alpinelinux.org/alpine/v3.12/main: temporary error (try again later)
WARNING: Ignoring APKINDEX.2c4ac24e.tar.gz: No such file or directory问题